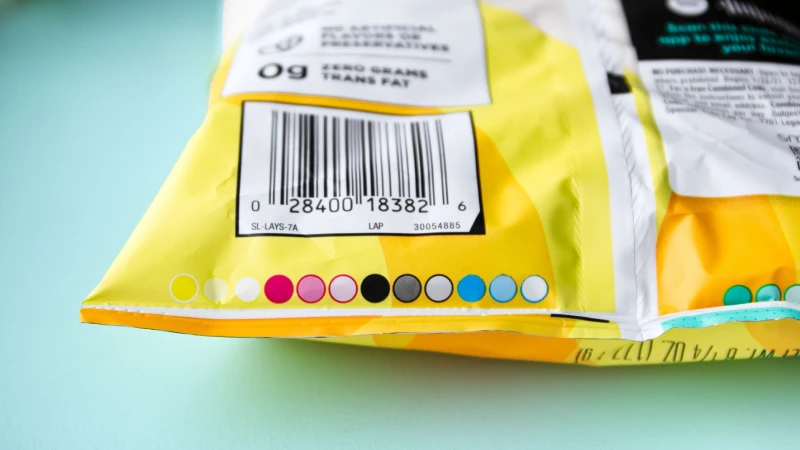
Getting UPC barcode placement right on flexible packaging is important for your business. Stand-up pouches and gusset bags have their own problems. After you fill these bags, they can bulge or wrinkle. This can mess up barcodes and make scanning hard. You should put the barcode on a flat, steady spot. Give it enough white space so scanners can read it easily. Do not cut off the barcode when you design the bag. This helps checkout go smoothly. At BN PACK, you get flexible packaging that meets global rules. They support Best Practices at every step.
Why Barcode Placement Is Critical
Scanning Reliability and Checkout Efficiency
You want your product to check out fast. If the barcode is in a bad spot, scanners might not read it. This can slow down the line. Both cashiers and shoppers can get annoyed. Here is how bad barcode placement can hurt your business:
Consequence | Impact |
|---|---|
Scanning Errors | Scanners can’t read the barcode, so staff must type in numbers. |
Operational Inefficiencies | Slow scanning means workers get less done, especially when stores are busy. |
Data Inaccuracies | Wrong data goes into inventory, which causes stock issues. |
Customer Dissatisfaction | Waiting at checkout makes customers upset and can ruin their shopping trip. |
When you use Best Practices for barcode placement, you help save time and stop mistakes.
Compliance with GS1 and Retail Standards
Stores and groups like GS1 have rules for barcode placement. If you do not follow these rules, you can have big problems:
Your shipments can get rejected if your packaging does not follow the rules.
Stores may charge you fines for not following the rules, and these can add up.
Stores may not want to work with you, and you could lose deals.
Orders take longer to process if barcodes are hard to scan.
Workers spend more time fixing mistakes, so labor costs go up.
Tracking inventory gets confusing, and you might have too much or too little stock.
Meeting these standards helps your business run well.
Impact on Brand Image
Where you put your barcode shows what your brand is like. Good placement makes your product look neat and trustworthy. Here is why it matters:
A barcode that is easy to see helps shoppers know your brand and trust it.
If you match the barcode with your design, it shows you care about details and your brand.
A clean, easy-to-scan barcode tells people your brand is dependable.
Scanning a barcode at checkout is not just a beep. It is when a shopper becomes a buyer. That quick scan makes the shopping trip feel finished.
Best Practices for Barcode Placement
The Flatest Surface Rule
When you place a barcode on a stand-up pouch or gusset bag, always look for the flattest spot. This is not just a suggestion. Industry guidelines say you should use a flat, smooth area for your barcode. If you put the barcode on a curved or wrinkled part, scanners might not read it. The code can get stretched or squished, and that causes problems at checkout.
Think about your BN PACK stand-up pouch. The back panel usually stays flat, even after you fill the bag. This makes it the perfect place for your barcode. You want to avoid spots that bend or fold. A flat surface keeps your barcode looking sharp and easy to scan. This is one of the Best Practices you should always follow.
Tip: Before you print, fill a sample pouch and check which area stays the flattest. That’s your best spot for the barcode.
Lower Right Back Placement
Most stores and packaging experts recommend putting the barcode on the lower right corner of the back panel. This spot is easy for cashiers to find. It also lines up with how scanners work at checkout. When you use this placement, you help speed up the scanning process.
BN PACK pouches give you plenty of space on the back panel. You can use this area for your barcode and other important information. By following this Best Practices tip, you make your packaging look neat and professional.
Avoiding Gussets and Seams
Gussets and seams might look like good spots for a barcode, but they cause trouble. These areas can stretch, fold, or wrinkle when you fill the pouch. If you put a barcode on a gusset or seam, it might not scan at all. The code can get broken up or hidden in a fold.
Always keep your barcode away from these tricky spots. BN PACK designs its pouches with wide, smooth back panels. This gives you a safe place for your barcode, away from any seams or gussets. Following this Best Practices rule helps you avoid scanning headaches.
Minimum Distance from Seals
Seals at the top and bottom of your pouch can also cause problems. If you put the barcode too close to a seal, the heat from sealing can blur the print. The barcode might get cut off or look fuzzy. Scanners need a clear, crisp code to work right.
Leave enough space between the barcode and any seal. A good rule is to keep at least 8mm (about 1/3 inch) away from the edge or seal. This keeps your barcode safe from heat and pressure during packaging. BN PACK’s customizable pouch designs let you plan your layout so you always have enough room.
Note: Double-check your design before printing. Make sure the barcode sits far enough from all seals and edges.
By following these Best Practices, you make sure your barcode scans every time. You also keep your packaging looking clean and professional. BN PACK’s flexible pouch designs help you follow these rules with ease.
Orientation and Integration Tips
Vertical vs. Horizontal Barcodes
You might wonder if you should use a vertical or horizontal barcode on your stand-up pouch. Each style has its own strengths.
Horizontal barcodes work best for most packaging. Scanners at checkout read them quickly. You get sharp edges, which means fewer scanning errors. These barcodes look great on wide, flat panels.
Vertical barcodes shine on curved or narrow surfaces. If your pouch bulges or has a small label, turning the barcode 90 degrees can help. Vertical barcodes may not print as sharply, but they still scan well—even if the printhead has a problem.
Tip: Try both orientations on a sample pouch. See which one stays flat and scans best after you fill the bag.
Integrating with BN PACK Stand Up Pouch Design

You want your barcode to look like it belongs on your pouch, not just stuck on as an afterthought. BN PACK makes this easy. You can customize every part of your pouch, including the barcode area. Choose the size, shape, and color that fit your brand. BN PACK’s 8-color HD printing keeps your barcode crisp and clear, even with bold designs. You can add windows, zippers, or special finishes without losing scannability. This flexibility helps you follow Best Practices and keeps your packaging looking sharp.
Maintaining Readability on Curved Surfaces
Flexible packaging can curve or bulge, making barcodes tricky to scan. You can use smart techniques to keep your barcode readable:
Technique | Description |
|---|---|
Multi-Angle Scanning | Scanners read the barcode from different angles, so you get a good scan even on a curve. |
Adaptive Scanning | Some scanners adjust to the shape of your pouch, making it easier to read the barcode. |
Error Correction | Advanced scanners can still read your barcode, even if it gets a little stretched or wrinkled. |
You can also keep your barcode away from the most curved spots. Place it on the flattest part of the pouch. Test your packaging both empty and full to make sure the barcode stays easy to scan.
Technical Guidelines for Printing
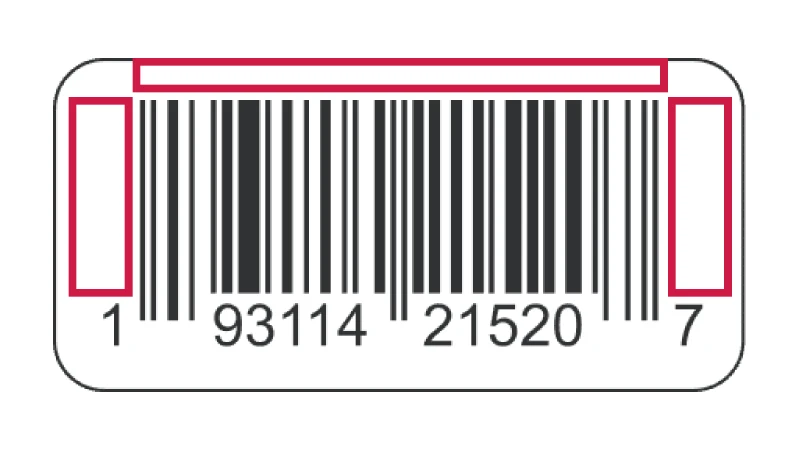
Quiet Zone and White Space
You want your barcode to scan every time. To do that, you need a quiet zone. This is the blank space around your barcode. It helps scanners find the start and end of the code. If you skip this step, your barcode might not work.
Here’s a quick look at the minimum quiet zone for different barcode types:
Barcode Type | Minimum Quiet Zone Requirement |
|---|---|
UPC-A | 9X |
UPC-E | Left: 9X; Right: 7X |
EAN-13 | Left: 11X; Right: 7X |
EAN-8 | 7X |
UPC/EAN Supplementals | Right: 5X |
QR Code | 4X |
You should always leave at least 0.125 inches of white space on each side of your barcode. This space keeps your barcode clear and easy to scan.
Barcode Size and Proportion
Barcodes need to be the right size. If they are too small, scanners can’t read them. If they are too big, they might not fit on your pouch. Here’s a table to help you get it right:
Size Type | Dimensions |
|---|---|
Minimum recommended size | 1.175″ wide by .816″ high |
Maximum recommended size | 2.938″ wide by 2.04″ high |
You should keep your barcode between 80% and 200% of the standard size. This helps with both printing and scanning.
Contrast and Background
Scanners love high contrast. You should print your barcode in black on a white background. Avoid busy patterns or colors behind the barcode. If you use a light color, make sure it is very pale. Dark colors for the bars and light colors for the background work best. Also, use sharp printing to stop the ink from spreading. Blurry lines can confuse scanners.
Tip: Always check your final print. Make sure the barcode stands out and the lines look crisp.
Human-Readable Font
The numbers under your barcode matter, too. You need a clear, easy-to-read font. Use at least 8-point size. This makes the numbers easy for people to read if the scanner has trouble. Pick a simple font with no fancy curls or decorations.
Use a legible font for the numbers.
Make sure the font size is at least 8 points.
When you follow these rules, your barcode will look good and work well on every BN PACK pouch.
Common Mistakes to Avoid
Placing Barcodes on Gussets or Edges
You might think any open space works for a barcode, but gussets and edges cause big problems. These areas bend, stretch, or wrinkle when you fill the pouch. That makes barcodes hard to scan. Here are some mistakes you should watch out for:
Choosing the wrong barcode symbology for your product’s industry.
Making the barcode too small, which makes it unreadable.
Ignoring the quiet zone around the barcode and letting designs crowd it.
Picking colors that do not contrast well, making the barcode hard to see.
Entering the wrong numbers or putting them in the wrong place.
If you avoid these mistakes, your barcode will scan smoothly every time.
Truncating the Barcode
Cutting off part of your barcode, or making it too short, can cause real trouble. When you truncate a UPC barcode, you risk more than just a bad look. Check out what can happen:
Consequence | Description |
|---|---|
Complete scan failures | You or the cashier must type in the numbers by hand, which slows everything down. |
Misreading of information | The scanner might get the wrong price or product, which messes up your inventory. |
Multiple scan attempts | The cashier has to try again and again, making the line move slower. |
Keep your barcode full size and clear to avoid these headaches.
Using Low-Contrast or Busy Backgrounds
Barcodes need to stand out. If you print them on a busy or shiny background, scanners struggle. You should always use bold black bars on a clean white or light background. If you use light ink on shiny packaging, the barcode can disappear. Small barcodes or low contrast make scanning even harder.
Choose a simple, light background for your barcode.
Make sure the bars are dark and bold.
Avoid patterns or images behind the barcode.
Ignoring Packaging Deformation
Flexible packaging changes shape after filling. If you ignore this, your barcode might stretch or wrinkle. That makes scanning tough. Always test your barcode on both empty and filled pouches. Place it where the bag stays flat. This way, you keep your barcode readable and your checkout process smooth.
Tip: Fill a sample pouch and check the barcode before you print a full batch. This small step can save you a lot of trouble later.
Testing and Quality Assurance
Scanning Tests on Filled and Empty Bags
You want your barcode to scan every time, no matter if your pouch is empty or full. Testing both conditions helps you catch problems before your product hits the shelves. Here’s a simple table to guide you through the steps for checking barcode scannability:
Step | Description |
|---|---|
1 | Set your barcode specs and know the rules you need to follow. |
2 | Make sure the barcode data is correct and matches your product. |
3 | Check the barcode quality before you print on your pouches. |
4 | Look at the barcode after printing to see if it’s clear and sharp. |
5 | Scan barcodes during and after production to catch any issues. |
6 | Write down your results and see if you spot any patterns. |
7 | Fix any problems and make changes to prevent them next time. |
Tip: Always test a few pouches both before and after filling. This helps you see if the barcode stays flat and readable.
Working with BN PACK and Your Printer
You don’t have to do this alone. When you work with BN PACK and your printer, you get expert help at every stage. Here’s how this teamwork makes your packaging better:
Quality Control Stage | Description |
|---|---|
Pre-production Checks | BN PACK checks materials to make sure they’re safe and strong. |
In-line Monitoring | During production, they check size, seams, and print quality—so your barcode stays perfect. |
Final Verification | Finished pouches go through stress tests to make sure they meet all standards before shipping. |
Note: BN PACK’s technical team can help you solve barcode problems fast. You get support from design to delivery.
Staying Updated with GS1 Standards
Barcode rules can change. You need to stay up to date so your packaging always meets the latest standards. Here’s how you can keep informed:
Check for updates on GS1’s website and read their guides.
Look for new tips about 2D barcodes and how they affect your business.
Use GS1’s resources to learn about changes for retailers and suppliers.
Ask your packaging partner, like BN PACK, for the latest compliance advice.
Staying informed helps you avoid surprises and keeps your products moving smoothly through the supply chain.
Quick Reference Checklist
You want your barcode to scan every time and look great on your packaging. Use this checklist before you send your design to print. It will help you catch mistakes and keep your product moving smoothly through checkout.
✅ Barcode Placement
Find the flattest spot on your pouch or bag.
Stick to the lower right corner on the back panel.
Keep the barcode away from gussets, seams, and edges.
Leave at least 8mm (about 1/3 inch) from any seal or edge.
✅ Barcode Orientation
Use a horizontal barcode for wide, flat areas.
Try a vertical barcode if your pouch is narrow or curved.
Test both ways on a filled pouch to see which scans best.
✅ Printing and Design
Leave enough quiet zone (white space) around the barcode.
Use a high-contrast color combo—black bars on a white background work best.
Make sure the barcode is between 80% and 200% of the standard size.
Pick a simple, easy-to-read font for the numbers under the barcode.
✅ Testing and Quality
Scan barcodes on both empty and filled pouches.
Check for wrinkles, stretching, or blurry lines.
Work with BN PACK’s team for expert advice and support.
Stay updated with GS1 and retailer barcode rules.
Tip: Print a few test pouches first. Scan them with a real scanner to catch any problems before you print a big batch.
Keep this checklist handy. You’ll save time, avoid headaches, and make your product look professional on every shelf.
You want your product to scan quickly and look good in stores. If you follow these best practices, you make scanning more accurate. This also keeps stores happy with your packaging. Putting barcodes in the right place helps you stop scanning problems and extra fees. Testing your design and using a checklist really helps.
Good placement makes barcodes easy to see and scan.
Small changes help you follow rules and make fewer mistakes.
Each type of packaging is different, so plan before you start.
Common Concern | Why It Matters |
|---|---|
Scanning issues | Slow checkout and unhappy customers |
GS1 compliance | Fewer chargebacks from retailers |
Testing before production | Ensures your barcode works every time |
You can work with BN PACK’s team for expert advice and custom help. Before you print a lot of bags, check your design and talk to a packaging expert.